Tuesday, October 23, 2012

Bedroom Bookshelf/Entertainment Unit-Part III

After building the first cabinet unit, I followed similar same steps to build a longer version of the first cabinet.  The only difference really is that is a longer length, and there are 3 main openings: one on the left (shown above in the highlighted area with one door covering the left side), the middle opening, designed to hold an electric fireplace, and the right opening, for another 2-cabinet door space.  See Ana White's blog here for building materials and instructions for the cabinet.
Next, I put the "cabinets" in my bedroom against the wall where I wanted them, and measured to find out what size countertops I would need.  I used two rectangular pieces of the same sanded plywood to make the countertop.  The one sitting on the cabinet on the left side sits on the cabinet, and extends past it to the back wall.  To give it more support in the back corner against the wall, I attached a sturdy 2x4 into the wall studs. Then I glued and screwed the countertops down onto the cabinet boxes.  So that they wouldn't show later, I screwed them down in areas where I knew that the bookshelf units that would be covering the countertops.


After that, it was time to build the bookshelves on top of the cabinets.  I started with the one on the left side, above the smaller cabinet unit.  Again, I followed the basic design of the cabinet for constructing, except it was much taller, with a hollow middle to add 3 shelves later with shelf pins.

It took some thinking to figure out how to make the shelving meet in the corner. If I simply added another vertical piece to each end,  and connected them, it would have been simpler, but I would have sacrificed the whole corner of storage space.  So I decided to add a plywood piece to the corner of the back wall, and give the shelves some support that way so that the corners could remain open, shown below.


The next step was to add a level of bookshelves on top of the longer cabinet against the back wall.  This one had an opening for a shelf on the left and the right, and an opening in the middle for a tv.  To secure it to the wall, I screwed the furring strip on the back of the unit into studs in the wall.  

On top of that unit, I added another rectangular unit on top of that, again with 3 openings, and screwed through the furring strips into studs in the wall.  Then, I installed shelving throughout the bookshelf units.

I added trim frames to the faces of all the cabinets with 1x2 pine trim strips, and 1x3 inch trim around the top to connect it to the ceiling, all with finishing nails and glue.  I also added trim to the edge of the countertops, and moulding all the way around the bottom of the unit to the carpet. Finally, I used caulking all around the unit in any spaces where there were gaps, and painted the entire unit the same color eggshell paint as the wall, and installed the cabinet doors and hardware.  

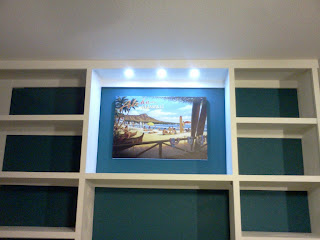
The last steps were to install puck lights above the space where the artwork would be displayed, and to install a power strip inside one of the cabinets for easy access for electrical cords.

Above and at left, you can see the cords for the puck lights, tucked behind the cabinet frame and secured with cable ties to the cabinet.  The light switch is at the bottom right of the photo.


At right, you can see where I drilled a hole through the inside of the cabinet so that there was a way to run a power cord through to the other side.  Behind the fireplace, I screwed a power strip onto the side of the cabinet. Shown above, there is another hole drilled down through the countertop, from the space for the tv, to the power strip behind the fireplace.


Voila!  We are very happy with our new bookshelves and entertainment unit, and it's exactly what I had envisioned for this space.




Thursday, October 18, 2012

Bedroom Bookshelf/Entertainment Unit, Part II-The First Cabinet


I couldn't find an exact building plan for the bookshelves I wanted to build online, so I had to design a custom unit.  I measured the walls carefully, drew up a plan on paper, and broke the project down into roughly 4 sections.  The first section to build was the bottom left cabinet, highlighted above left.  


I have never built a cabinet before, but I found a plan for kitchen cabinets on one of my favorite blogs, www.ana-white.com, here (thanks, Ana!).  I modified the plans slightly to fit my space, removed the upper horizontal panel and made the cabinet doors taller for more storage space.

Here was my first take on the cabinets:

You can see that I started with melamine panels for the sides and bottom, but while it is nice and white, the edges can show wear, and it is not paintable.  Melamine is also fairly heavy.  I decided to switch to plywood panels instead, so that I could paint them the same color as our bedroom walls, which is a slightly off-white color, to give it a more professional built-in look.  


Here is the wood version, after I added the doors.  I used a good-quality sanded plywood sheet, cut into pieces for the sides and bottom (I added the top later).  The doors are made from laminate pine wood (pieces of wood basically glued together into a panel), with pine moulding as their frame.  I later painted it, but it would also look very nice stained.

This might not look like much, but it was an important step for me in learning how to build the rest of the unit.  It was the building block that the remaining project was modeled after.

Work Area Pegboard


After building a work bench, I wanted to add a pegboard behind it on the wall to hold my tools, cords, etc. Fortunately, my neighbor had a large 4’ x 4’ pegboard but only needed a small 6”x6” piece of it, and he gave me the rest. 

In order to have the pegboard stand out from the wall by a couple of inches, I first attached two 2 x 4 boards horizontally to the studs in the wall, one along the wall where the top edge of the pegboard would be, and one along the bottom edge. The space between the pegboard and the wall allows a variety of peg holders to be placed into the peg holes.


After inserting peg holders and putting up the tools, my son made a sign for me saying “Mom the Builder,” by using a magnifying glass and the sun to burn the letters into the wood. I found a clip-on light from a thrift store and clipped it onto the edge of the pegboard for more light when I work.

The project cost about $20 for the 2x4s, screws, peg holders, and clip-on light. Pegboards this size cost about $9.


Materials/Hardware Used:

2 – 2 x 4 x 4’
1 – 4’ x 4’ pegboard
3” screws
Pegboard hooks
Stud finder
Power drill


Tuesday, October 16, 2012

Reclaimed Wood Workbench


My sister, also a building mom, inspired me to build a workbench.  She was amazed when visiting to see that I had built all of my projects on my garage floor or back patio.  That includes the kids’ playground, pergola, picnic table, and built-in bookshelf in my bedroom!  We do have a wooden kids’ table inside the house that I would sometimes bring into the garage to use, but by and large my workspace was on the floor.  Not so great for my back and neck!  So after I visited her in Pennsylvania and saw the bench/table she had built in her garage, I was inspired to build my own. 

I set out to studying my garage and figuring out where in the world to put it.  We have a 2-car garage, no basement, and an attic that gets too hot in the summer to store anything.  Plus three kids who between them have bikes, scooters, a skateboard, fishing equipment, tents, sleeping bags and mats, etc.  Not a lot of room left over when we park both cars in the garage!  Finally, I decided to get rid of a big plastic stand that was holding various landscaping tools, hang those tools up on the wall, and put the work table in its place.

First, I used a studfinder to find the studs in the wall, and used drywall screws to attach a horizontal 2’x4’ pine into the studs, at 42.5" inches up from the ground. The 2’x4’ was several inches shorter than the length of the countertop I was going to use.  

Next, I cut down two 2’x4’s to 42.5 inches to be the vertical legs supporting the front of the tabletop.  (This makes for a rather tall tabletop.  I am fairly tall at 5'8", but if I did it over again I would make it more like 38 inches to be able to look down more on my projects as I build.)  Assembling them together on the ground, across the middle of those 2’x4’s, I screwed in another 2’x4’, so that the 3 pieces looked like an “H.” 


Just as I was about to make a run to Home Depot for some wood for the table top, I noticed that a neighbor around the corner was moving out of their house and getting rid of some old furniture, including a slab of wood that looked like an old desk top. It was a little scratched up, but the perfect size for a workbench.  With my son’s help, I placed it on top of the upright 2’x4’s I had prepared, and screwed the table top down into the 2’x4’s with 2" wood screws.

 Then I used screws to attach the tabletop into the top of the horizontal 2x4 that I had already attached to the wall.  I screwed them in at an angle, since the tabletop was too close to the wall to get a screw in vertically.


With a recycled tabletop, the total cost for this project was free, because I used leftover 2 x 4's I had laying around and spare screws. I think it would cost about $30-$50 if you had to purchase all new materials. Not bad and my back is much happier!

Materials/Hardware Used:

1- 60" x 24" recycled wood countertop (a plywood piece could also be used)
1- 2' x 4' x 49" lumber (horizontal wall support)
1- 2' x 4' x 39" lumber (horizontal cross brace)
2- 2' x 4' x 42.5" lumber (vertical table legs--this is the length I used, but I recommend shorter, unless you're over 6' tall.)

Studfinder
power drill
2.5 inch wood screws
level