
Thursday, April 26, 2012
Recycling Cardboard Packaging
Monday, April 23, 2012
Food on the Table

Recently, I have been trying out a computer program and app on my phone for grocery shopping and meal planning, called Food on the Table . This is a great resource that helps you plan meals for the week, based on your family's preferences, and save money. There are many recipes to choose from, with reviews included. You can even specify any dietary restrictions such as vegetarian, gluten-free, low-sodium, or low-fat. After selecting recipes your for the week (or adding your own), the program automatically builds a grocery list for you. You can even link it to your local grocery stores to find sale prices on any items on your list. Finally, you can access your list on your smartphone or print it out and check off items as you shop. If you're looking for a way to get organized with meal planning, or maybe you just want some new recipe ideas, I highly recommend trying Food on the Table. Until 4/30/12, lifetime membership is free with the code: SPRINGFREE. Simply register your email address, download the software on your computer, and then download the app on your iPhone or Android smartphone. Happy grocery shopping!
Friday, April 20, 2012
Pergola Irrigation
Once our pergola was up in the back yard, it didn't take me long to
realize that I needed to create some sort of irrigation system to
regularly water the grapes in the pots. One day without water in our
100+ degree weather could seriously harm or kill the plants, and with
our busy lives, I was afraid that would happen too easily. So I came up
with a plan. I wasn't sure that the water pressure would be strong
enough, but I wanted to try connecting a long, 1/4 inch irrigation
tubing to our existing irrigation lines, up the side of the pergola,
along the tops, and down to each pot.

 I used green irrigation tubing
from my local plant nursery, and picked up some cable nail clips from
the hardware store, like this:
I used green irrigation tubing
from my local plant nursery, and picked up some cable nail clips from
the hardware store, like this:
They are just the right
size to hold the tubing in place. I connected the tubing to the nearest
existing irrigation line we had, ran it across a short section of the
patio, and connected the line all the way up to the top of the post
using cable clips. At the top of that corner, I split the line into two
lines by connecting an irrigation piece to it, ran one line over to and
down one post, and one off to another post. From that 3rd post, I
split it again to have one line go down that post, and one line go
across the top toward and then down the remaining post. Near the post
bottoms, where the pots are, I connected a short piece of tubing with a
bubbler on the end to go directly into the pots.
 Here's a photo showing the irrigation line going across near the top of the pergola. For the bubblers, I used adjustable flow ones, so that I can adjust the amount of water coming out to water the pots. Depending on rain and heat, sometimes I need to increase or decrease the water. I turned on the irrigation system after rigging it up, and voila! We have water for the pots.
Around the grape vines in the pots, I've added mesclun lettuce, spinach, strawberries, and some colorful flowers. It adds a lot of color to our patio.
Backyard Patio Pergola, Part II
 The next step was putting all the pieces of the structure together. I cut a small triangular piece off of the end corners of the 2x6 beams with a miter saw to make them look more rustic, and pre-attached the Simpson ties that would hold the 5 cross beams. With the 4 corner posts up, I put up 2 2x6'
beams on top of the left and right set of posts, the 6"-side attached
vertically to give the structure more height. I attached the beams with
Simpson ties that fit directly on top of the 4x6 corner posts, and have a
bracket that the 2x6s fit into. I drilled them into place. At this point, the posts were still somewhat wobbly.
The next step was putting all the pieces of the structure together. I cut a small triangular piece off of the end corners of the 2x6 beams with a miter saw to make them look more rustic, and pre-attached the Simpson ties that would hold the 5 cross beams. With the 4 corner posts up, I put up 2 2x6'
beams on top of the left and right set of posts, the 6"-side attached
vertically to give the structure more height. I attached the beams with
Simpson ties that fit directly on top of the 4x6 corner posts, and have a
bracket that the 2x6s fit into. I drilled them into place. At this point, the posts were still somewhat wobbly. Next, I cut off the
corners of 5 more 2x6" beams to look like the first 2. I carefully
lifted them up on top into prepared Simpson ties and drilled them into
place. The structure was more secure, but it still felt too unsteady for
my liking. After consulting some builder friends and online posts, I
decided to add the diagonal cross-braces in the corners shown at left,
attached with more Simpson ties and deck screws. Though it is not as
simple-looking, it definitely helped with stability, and the structure
is much more sturdy.
Next, I cut off the
corners of 5 more 2x6" beams to look like the first 2. I carefully
lifted them up on top into prepared Simpson ties and drilled them into
place. The structure was more secure, but it still felt too unsteady for
my liking. After consulting some builder friends and online posts, I
decided to add the diagonal cross-braces in the corners shown at left,
attached with more Simpson ties and deck screws. Though it is not as
simple-looking, it definitely helped with stability, and the structure
is much more sturdy.
 Next, it was time to put up the 2x4" beams, flat on top of the cross beams, and drill them into place. My plan started with using 7 2x4s, but I decided to add 6 for more shade. They were all pre-stained, pressure-treated lumber pieces from Home Depot. They cost a little more than the unstained wood, but it's worth it because I didn't have to deal with staining the structure, or re-staining it later on for upkeep.
With the structure in place, it was time to add some landscaping. I decided to use grape vines, as we already have 2 in our yard that do well here in the sun and heat. They grow quickly, can be trained to climb up structures, and are bare in the winter, allowing the sun through to warm up our house. I purchased 4 terracotta pots and 4 1-gallon grape plants, to put one at each corner post, in hopes of training the grape vines to climb up and on top of the pergola.
Here is the final product!
 The pergola itself, including lumber and hardware cost just under $500.
The plants and pots were another $100.
See my next post on Pergola Irrigation to see how I designed a drip system to water the grapes.
*Please note, I am not a professional builder or designer. Please be
familiar with your local building requirements and safety issues before
beginning your own building projects!
**You are welcome to use my designs or improve upon them, I just request that you send me a photo of your project when you are done!
Tuesday, April 17, 2012
Backyard Patio Pergola, Part I

After building the kids' playground and fort, I felt like I could build anything! Since we moved into our house almost 9 years ago, we had done the landscaping in the backyard and hired a contractor to put in a patio. The back of our house faces west, so in the (HOT!!!!) summer here, the afternoon sun faces our house.

Though our windows are chemically treated like many in Las Vegas to keep out the heat, and we have solar blocking curtains inside to cover the sliding doors to the patio, every little bit of shade helps. I had been thinking that it would be nice to have a partial patio cover of some sort, that could be covered with vines to provide shade in the summer, and allow the sun to come through during the cooler winter. Then we went camping at San Clemente State Beach in southern California, and I found what I wanted to build right at our campground!

I liked it because it seemed like pretty simple, straightforward construction, involved materials that I could find at my local stores, and looked rustic. It would be a great structure to train vines on. So, with my hubby's encouragement, and a lot of photos of the San Clemente pergola and others I found online, I set to work.
I took a lot of photos of the pergola at San Clemente, so I would know what materials to use and how to connect everything. My biggest concern was building a safe structure that could withstand the desert winds and heat. How could I secure the pergola posts to our concrete patio? Was it even possible?
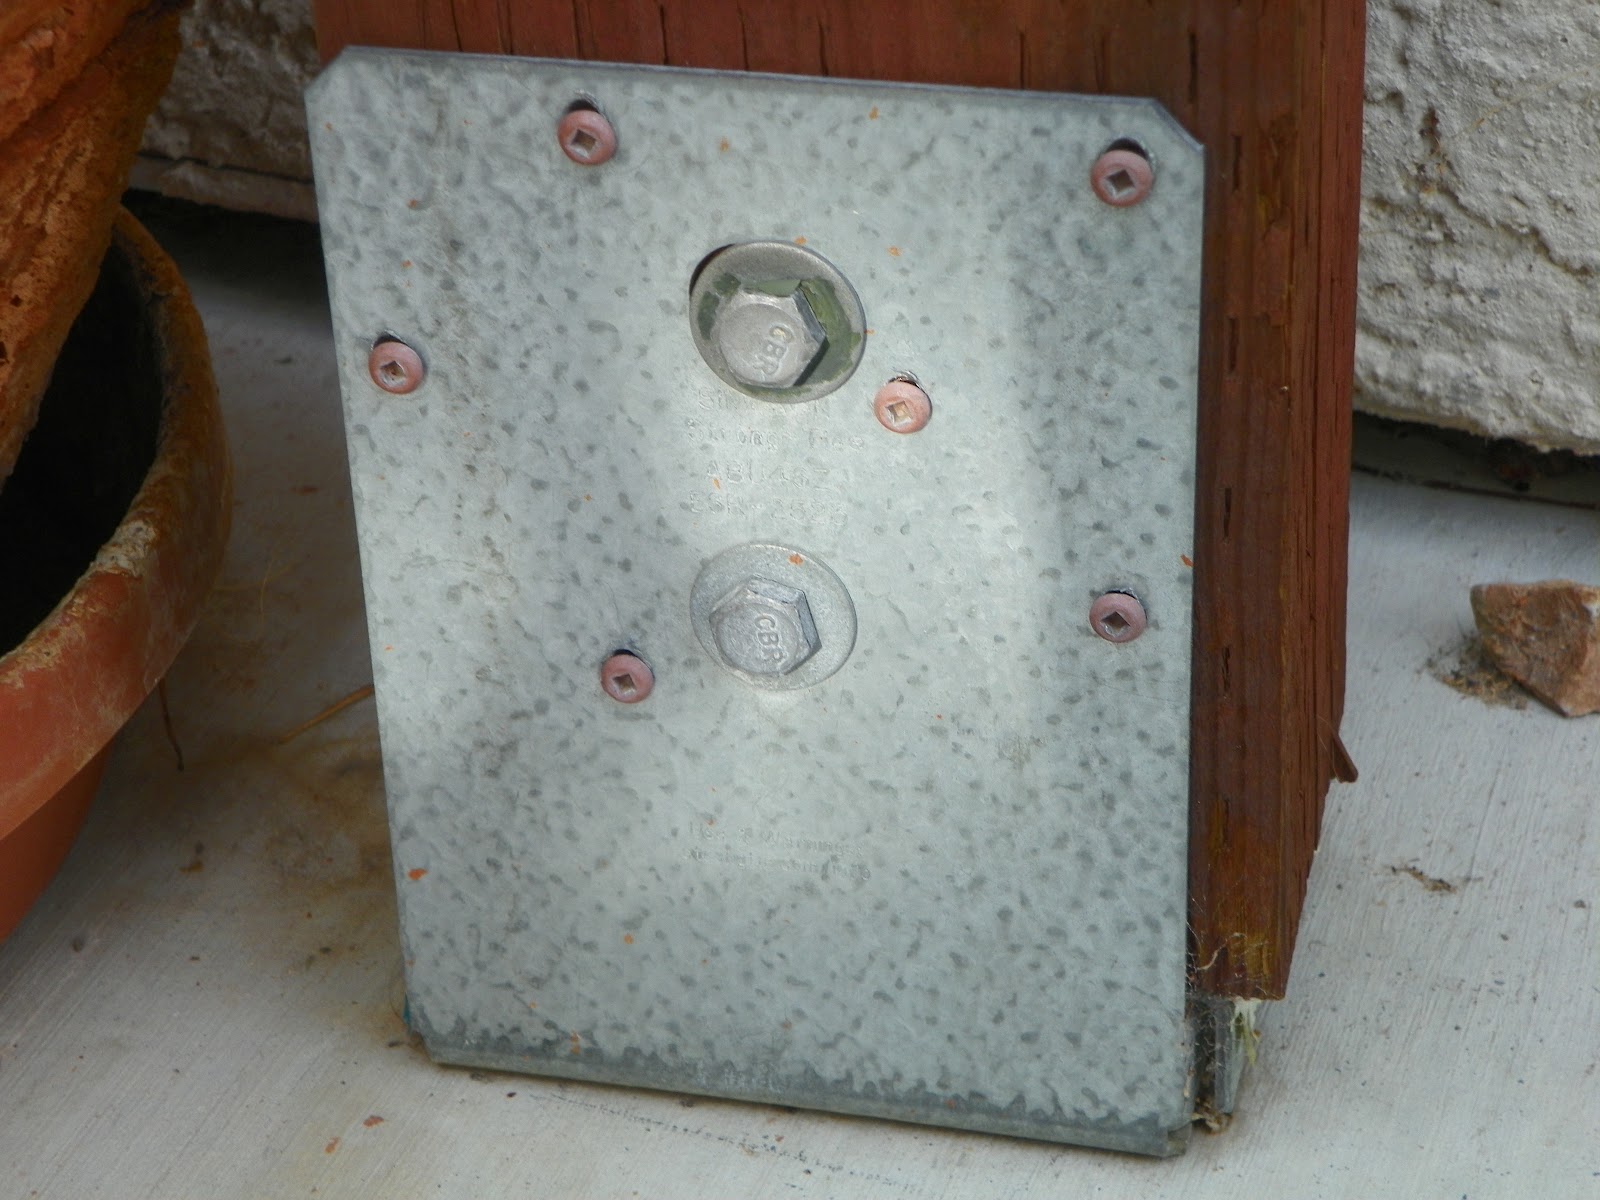 With some research, I found out that Simpson Strong-Tie makes some steel supports specifically designed to support vertical posts, and with wedge anchors, can be securely attached to existing concrete foundations. Here's what the post bases look like:
These can be bolted down onto a solid, existing concrete slab, and the posts connected to the base with screws or bolts. Getting them connected to the concrete was the biggest challenge for me. I highly recommend using or renting a hammer drill if you can. I did not have one, and wanted to try using my power drill with a large masonry drill bit, which I did. However, it took a LOT of patience to do it that way. I went through two drill bits, and it took me drilling on and off several hours over the course of 3 days to drill the holes deep enough to secure the wedge anchors. Here is what they look like:

Basically, you drill a hole into the concrete just wide enough and deep enough for the wedge anchor, drive it into the hole by tapping with a hammer, place the post base in place over the anchor, and tighten it down with the washer and nut. Then the pressure from the load it holds causes the wedge at the bottom to expand, holding the wedge anchor (and what is connected to it) securely in place.*

After the post brackets were in place, I put up and secured the posts to them. Then it was time to figure out what the top of the structure was going to look like. I laid out the pieces of pre-stained, pressure treated lumber on the patio, to visualize the shape and plan the space between the slats, and pre-drilled the pilot holes, so they would be easier to connect up high.
Next would come the fun part: putting it all together!
*Please note, I am not a professional builder or designer. Please be
familiar with your local building requirements and safety issues before
beginning your own building projects!
**You
are welcome to use my designs or improve upon them, I just request that
you send me a photo of your project when you are done!
Subscribe to:
Posts (Atom)